|
~Skeg's Guide to building Parks~
by Skeg
Two Methods
Landscaping Your Park
Paths
Queues and Lines
Ride Exits and Entrances
Ride Timing and Capacity
Custom Building Rides
Ride Placement
Stalls and Stands
Themeing a Park
|
You've got a big, square, green void on your screen and lots of money.
Where do you start? You may be looking to add to another park, but whether
you're starting from scratch or expanding a developed park, the same
principles apply. Many of these techniques also apply to the scenarios,
but see
scenario tips
to learn more about building with limited
time and money, tips on pricing and maintaining a park.
|
Two methods
There are two
approaches to building a great park
Build main features first and work round them.
Building the
big coasters first makes it easier to interlock them without having to
remove smaller rides and attractions that may be in the way. This method
also enables you to lay down sensible paths. However, it has its
disadvantages. Firstly, you will be unable to test your park. Peeps hate
walking a long way if there's nothing to do along the way. They'll become
bored and go home. You'll also need a lot of handymen and mechanics for
just a few rides because of the distances involved. It's also easy to
forget things such as drinks stands and toilets if your screen is full of
coasters. Building from the top down also requires a lot of planning!
Finally, once all the big rides have been built it can get quite boring
filling in the spaces with golf courses and flowerbeds and it's quite easy
to forget to build that extra toilet if all you can see is rides.
Of course, if you're expanding an existing park then this is the only
way to go.
Build one area at a time
The other approach is to build small
'parks within a park'. By concentrating on a small area you are more
likely to achieve a balanced park, with guests not having to walk miles to
reach the nearest refreshment stand. If you start construction near the
entrance you can also periodically test your park to get guest feedback
and check for problems. Using this method also allows you to worry about
what to do with 'big green space A' another day. Nevertheless, there are
disadvantages. Should you wish to build a transport ride, say, into each
small park section, you'll have a lot of demolition and tweaking to do.
It's also quite tricky to construct a good network of paths.
Which method should you use? I tend to use a bit of both. I'll either
landscape
the whole park first or just a small area that I'm going to build on and
put in my main coasters and transport rides. Then I'll landscape adjacent
areas and build any rides that will end up over or under the original park
area. I'll also put in the main paths from area to area. Then I'll use the
second method to finish off the original section. If I get bored I might
start work on one of the other areas. If I open the park for testing I'll
just demolish any dead-end paths and only open the rides that are in the
finished section.
Back to the Top
|
Landscaping your park
 Whichever method of building you use, at some point
or other you'll have to landscape your park. A park built on flat, green
land is boring to look at and not much fun to build on. By landscaping I
mean changing the terrain. Trees and other bells and whistles are best
left until all the attractions are in place. The only thing more tedious
than planting trees is demolishing them! Landscape each section of your
park before you begin building on it. You can change a few things once
your main coasters are in place, but it's difficult to raise the Andes if
there's a corkscrew in the way.
Whichever method of building you use, at some point
or other you'll have to landscape your park. A park built on flat, green
land is boring to look at and not much fun to build on. By landscaping I
mean changing the terrain. Trees and other bells and whistles are best
left until all the attractions are in place. The only thing more tedious
than planting trees is demolishing them! Landscape each section of your
park before you begin building on it. You can change a few things once
your main coasters are in place, but it's difficult to raise the Andes if
there's a corkscrew in the way.
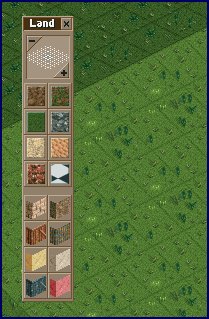
The main thing to remember is to keep the terrain natural looking. Use
the 'mountain builder' terrain-raising tool (one level lower than the
single square spade button - click on the minus sign). It raises the
square underneath the spade and also the surrounding land to create a
sloped contour. Beware! It raises and lowers land of adjacent squares
whether you wanted them moving of not... It takes a bit of practice and
can be expensive (not that money should be a problem). Do it a bit at a
time and if you're unsure of the consequences then save the game first.
Unless you're going for the 'Himalayan' look it's best to include some
flat areas. This will also stop your park from turning into a forest of
supports when you build rides and paths. Not all terrain has to be hilly.
You can build houses, walls, aqueducts, dams and anything else you can
think of...
Don't forget that you can also change the look of the terrain, from
grass to Martian rock or from muddy cliffs to brick walls. This is
especially important if you want to create a
well themed
park. Try to include water in your park. A river or sea will
help you separate themed sections and make your park more interesting to
look at. And hey - no park is complete without a boat hire!
If you can't be bothered to do this (it is quite boring) then check out
some of the
blank parks.
Back to the Top
|
Paths
One of the most important
things in any park is the path layout. You can have the greatest rides in
the world, but guests need to be able to reach them. Before building
anything else you should build the main routes through the park (or at
least have an idea where they will go). Guests and staff all use the same
algorithm to move around the park. They travel in a straight line until
they meet an intersection where they will randomly change direction. The
exception to this is a guest/mechanic who is heading for somewhere
specific. Note that ride entrances and shops/stalls create intersections.
Avoid dead ends.
Try to construct paths in giant loops so
guests don't need to cover the same ground twice. If a path leads to just
one attraction then a guest's happiness won't be getting any higher as he
or she makes the long journey back down the track if he or she didn't go
on the ride. At the very least, every path should lead somewhere;
otherwise peeps will get lost. If you have to build a path from a ride
exit then place a 'no entry' sign (AA/CF only) on the main path to avoid
unnecessary trips. Your handymen and mechanics will ignore the sign.
Avoid long, boring paths.
Aim to have as many attractions as
possible on a stretch of path. Long, deserted stretches will result in
guests becoming bored and going home or getting lost.
Avoid excessive intersections
A guest without a park map may
get lost. Peeps are also likely to turn right around and head back from
whence they came - resulting in far-flung areas of the park being almost
deserted and paths close to the entrance becoming too crowded.
Advertise with paths
By building paths through coasters you
can encourage guests to ride them. Such paths also increase the
excitement rating
of your rides.
Paths can also be used to create
dark rides
in a park.
Back to the Top
|
Queues and lines
When decided how
long to make a queue line bear in mind that each square holds five guests.
By checking the capacity of a ride you can tailor the length of the queue
and avoid guests becoming bored whilst waiting in line. This is especially
important for long rides such as the 3D cinema and simulator that only
have a limited capacity. Peeps who are waiting in line are not getting any
happier and in extreme circumstances will begin checking their watches and
complaining. They may even leave the queue (often to begin queuing again
for the same ride - duh!). Similarly, more popular high capacity rides
such as roller coasters need a longer queue line. If a queue is full then
peeps won't join the line and a short queue may result in a train waiting
a long time in a station or leaving only half full and you'll miss out on
cash!
If possible queues, should be placed with their entrances on busy
thoroughfares. This cuts down on wasted trips by peeps who walk down a
long path only to discover that they didn't want to go on the ride at the
end of it. It also increases the chance of a guest queuing for the ride.
In general, it's best to avoid lengthy queues, but if a park is
becoming too crowded then it's preferable to have guests waiting in line
rather than whinging about the park being too crowded. If a long line is
unavoidable then try to make the wait as interesting as possible to
maintain a guest's happiness and stop them wandering off. This can be done
through the use of scenery and themeing or by hiring entertainers to
patrol the area. With the add-on pack it's also possible to make each ride
play music to keep peeps happy - click on the peeps tab of the ride
window. (You might want to stop the music being played through your
speakers on the options screen because it gets quite annoying. You won't
be able to hear it anymore, but your peeps will.)
As with paths, building queues through other rides makes guests aware
of them and also increases the excitement rating
of the ride. Finally, it's not
absolutely to build a queue. If a ride entrance opens onto a path then
guests will just jump straight on the ride (if there's room). This is
useful for less popular rides such as hedge mazes and slides that run
continuously.
Back to the Top
|
Ride exits and entrances
It's
easy to forget to allow room for exits and entrances when planning where
to put a ride, especially when custom building a ride. However, they are
one of the most important parts of any ride. Efficient placement of exits
and entrances will increase the throughput of a ride and thus increase its
profits. Wherever possible, try to place exits immediately adjacent to
existing paths (see above).
Note that it's not essential for the path to be on the same level as the
exit - if the path is below the exit then guests will just drop down (or
into the sea and drown if there's water there!) The placement of an exit
in relation to the ride is not as important - the peeps are happy and
they've already parted with their cash. They're unlikely to jump straight
on to another ride so they can be allowed to take their time reaching the
ride exit.
Placing a ride entrance is, however, extremely important to ensure
efficient ride operation and cut the queuing time. On rides with a fixed
boarding point, place the entrance on the same side as the ride loads
from. This is usually on the side that the yellow arrow points to during
construction. For example, on the 3D cinema, the entrance needs to be on
the same side as the hole where peeps enter the building. This will
cut-down on the time it takes to load a ride since guests don't have to
walk as far. Of course, some rides don't have a fixed loading point, the
pirate ship and roto-drop for example.
 On rides with single cars, place the entrance right at the
front of the station. For rides with trains, the entrance should be
at the middle of the front train. That way, peeps have just as far to walk
to the front and back of the train. See the section on ride
timing for more ways to run coasters efficiently.
On rides with single cars, place the entrance right at the
front of the station. For rides with trains, the entrance should be
at the middle of the front train. That way, peeps have just as far to walk
to the front and back of the train. See the section on ride
timing for more ways to run coasters efficiently.
Back to the Top
|
Ride timing and capacity
It's
usually possible to alter the timing (under the 'cogs' tab) and the
capacity (under the 'vehicle' tab) of a ride. Generally, it's best to have
the capacity of a ride as high as possible. In particular, the default
number of guests allowed in the slide and hedge maze can (and should) be
increased. Using different cars and trains can also increase the ride
capacity, for example, the 'bumper boats' on the boat ride. Building the
maximum number of station sections allows you to run more trains/cars.
Note, however, that rides which use only single cars (such as the wild
mouse and single rail coaster, the water rides, Virginia reel and car
rides) cannot have more than 12 cars. Usually this won't require the
maximum number of station sections. Indeed, since all cars slow down to at
most 5 mph in stations, it may lead to an inefficient ride. Remember too,
that increasing the number of trains on a coaster usually leads to a
decrease in the overall capacity (though it can actually improve the ride
by increasing the throughput). Some rides, such as the bumper
cars/dodgems, go-karts in race mode and saucers always 'wait for full
load', so if that particular ride is unpopular then decrease its capacity.
Generally it's best to keep the duration of a ride under 4 minutes. Any
longer and peeps start becoming bored, wanting the toilet and complaining.
Usually this won't be a concern, but be careful when designing
water and transport rides.
Always change the number of rotations on the Ferris wheel to 1,
otherwise peeps will start wanting to get off...
Except for a few circumstances, such as below or if a ride is really
unpopular, ensure that a train will always 'Wait for full load' before
leaving the station or has a low 'maximum wait' time. If guests have a
long way to walk from the entrance to board a ride then the 'minimum wait
time' may need to be increased to avoid trains leaving half full despite a
long queue.
For rides with a small capacity or a large number of vehicles, it may
be necessary to tweak the ride timings further. The aim is to keep the
queue for the ride moving as evenly possible, so that peeps don't start
looking at their watches and queues are never empty. Set the 'minimum wait
time' according to the formula
Min Wait Time= Ride duration / (Vehicles on Ride - 1)
This should ensure that there's always a vehicle in
the station. Remember to change the default 'Wait for full load' to 'any
load'. Bear in mind that time spent sitting in a station is included in
the duration of the ride. If a ride is already approaching 4 minutes in
length it may lead to "I want to get off Water Ride 1" messages.
Go-karts that are set to 'race mode' and transport rides cause their
own problems - see
below.
Back to the Top
|
Custom building rides
For
tips on designing roller coasters click
here.
Water rides
Water rides (except for the boat hire and water
slides) move very slowly when not going downhill. The water also slows
boats quickly after drops. When building one of these rides try to include
a lot of short drops to keep boats moving. Boats also move more slowly
when fully loaded, meaning that the ride duration under testing may give a
false impression. If a ride is approaching 4 mins in length before it has
even opened, then be prepared to shorten the track.
Water slides are prone to crashes if not designed properly. Be sure to
test the ride before opening and place enclosed track on fast sections on
and after corners. I always use enclosed sections underground (as it's
dark anyway). Steep drops can also cause the boats to explode. Water
slides (including some pre-built ones in the scenarios) can also get
stuck. If this happens, reset the ride (by double clicking on the stop
button), uncheck 'maximum wait time' and make sure that the boats 'wait
for full load' (heavier boats have more momentum to get up hills).
 The boat hire ride can also get jammed. Often, there's not much
you can do about this (it's just peeps being stupid), other than adding
more water near the problem. If boats are wandering off and getting lost
then either raise land to block off an area or add a guide rail to steer
boats in the right direction - the track doesn't have to be a complete
circuit. Waterspouts (AA/CF only) can also be used to stop guests rowing
into trouble.
The boat hire ride can also get jammed. Often, there's not much
you can do about this (it's just peeps being stupid), other than adding
more water near the problem. If boats are wandering off and getting lost
then either raise land to block off an area or add a guide rail to steer
boats in the right direction - the track doesn't have to be a complete
circuit. Waterspouts (AA/CF only) can also be used to stop guests rowing
into trouble.
Go-karts
Go-karts can be made more exciting by setting them
to 'race mode'. However, the race winner always goes on to complete a
victory lap. Try to set the number of laps so that the winner's extra lap
doesn't hold things up too much. Note, that since you can't test go-karts,
this can only be done once they're open. If this seems like too much of a
drag, then set your karts to 'continuous circuit mode' and charge 'em
less... they'll still go on it!
Transport rides
Most transport rides can be set to either
'shuttle mode' or 'continuous circuit mode'. The exception is the chair
lift, which is a two-way track - and don't forget to increase the speed of
the chair lift!
Shuttle mode doesn't need a loop of track but it can only have one
train. Unless space is tight (or it's a scenario and money is tight) then
it's best avoided. Instead, stick to continuous circuit mode. It requires
a bit more planning but can get more people from A to B. Always build
station platforms as long as possible and remember that the capacity of
the ride is determined by the length of the shortest platform. Use covered
trains to get guests on the ride in the rain. Resist the temptation to
make the rides too long. The longer the ride, the less peeps will be able
to use it and in extreme cases they'll want to get off. Don't forget that
transportation isn't the only use of these rides. They are also a
brilliant advertisement for other rides, so make sure the track goes
through coasters. Even in the scenarios, I never charge for transport
rides. For more adventurous guests, build a few rollerbuses.
Dark rides
 Most rides cannot be built underground. However, other rides can
become dark rides through the use of paths. For example, by building paths
over a boat ride you can simulate a 'tunnel of love'. The paths don't need
to be used as paths. It's even possible to build a whole park underneath a
roof. Just remember that the maximum height of a path above ground is 20.
Wooden coaster tracks also provide a nice 'pagoda' look.
Most rides cannot be built underground. However, other rides can
become dark rides through the use of paths. For example, by building paths
over a boat ride you can simulate a 'tunnel of love'. The paths don't need
to be used as paths. It's even possible to build a whole park underneath a
roof. Just remember that the maximum height of a path above ground is 20.
Wooden coaster tracks also provide a nice 'pagoda' look.
Back to the Top
|
Ride Placement
In the real
world, park designers put their biggest and best rides in areas which
require the paying guest to walk past many other attractions to tempt them
to part with their cash. The reason that this works is because the guest
knows that the ride is there. In RCT, peeps only become aware of a ride if
they walk/ride past part of it - hence the need for well-placed paths and
intertwining rides. Apart from this, there are other techniques to keep
guests happy and spending money.
Build a variety of rides near the entrance so that every guest is
catered for. If they can jump on a ride that suits their tastes straight
away, then they'll become happier more quickly. More timid guests will
also benefit from an increase in their 'preferred intensity' rating.
Even the most hardened coaster enthusiast will want to relax on a more
feeble ride once in a while. Avoid building rides with similar intensities
all in the same area. Guests will become unhappy if they have to walk past
too many unsuitable rides. However, more distant parts of a park can have
fewer gentle rides. By the time peeps have arrived there, they will have
built up their intensity tolerance levels. Usually it's possible to have
just coasters and (the less thrilling) thrill rides at the back of a park.
Back to the Top
|
Stalls and stands
There are two
approaches to building concessions. The first is to design 'food courts'
in sections of a park. This has many disadvantages. Firstly, it may
involve a long walk for peeps. Secondly, a guest who wants a drink may not
necessarily want to buy a balloon. Thirdly, they create a lot of
intersections, resulting in guests bouncing around (and even getting lost)
and not getting any happier. Fourthly, they take up space that could be
used for a ride. Finally, they don't take advantage of guests.
Instead, scatter shops and stands throughout the park, building them in
spaces that would otherwise be full of flowerbeds. Put toilets and drinks
stalls near the exits of vomit-inducing rides (sick guests are thirsty
guests, but drinking won't make them puke). Souvenir, balloon and hat
stands should be placed near the exits of exciting rides, since happy
peeps are more likely to spend money. The add-on pack allows you to change
the colour of balloons, hats and umbrellas - making it easy to see which
stalls are the most popular. Don't worry too much about building food
stalls near your chunder rides as green guests will usually end up all
over the park. If they're stupid enough to want something to eat then
they'll find somewhere to eat anyway! Try to build information kiosks at
intersections to take advantage of the fact that they have four windows.
One should always be situated close to the entrance before any paths
diverge to allow peeps to buy maps and brollies. When building food
stalls, try to have a variety of shops in an area. Toffee apple, ice cream
and candy floss/cotton candy shops don't generate any litter. Build plenty
of benches and litter bins near food and drink stalls as guests like to
sit down to enjoy their food. Popcorn and chips/fries also make guests
thirsty.
Back to the Top
|
Themeing a park
 As well as improving the look of a park,
themeing increases the excitement of rides and keeps visitors happy - "the
scenery here is really beautiful".
As well as improving the look of a park,
themeing increases the excitement of rides and keeps visitors happy - "the
scenery here is really beautiful".
The key is to use your imagination, but try to be consistent. Whilst
the odd barrel in a Roman themed area will look good, a giant pyramid next
to a huge mushroom might look a bit daft. A colour scheme for rides in
each area will improve the overall look (although it will have no effect
on ride stats). With the add-on you can paint sections of rides which
cross more than one themed area as well as laying different types of path.
Try to separate different areas of themeing through the use of water,
walls (both on paths and ones built from raised land) and other terrain.
Remember too, that other landscape features, such as trees and bushes can
also be used to shield areas of park as well as contributing to the look
of a park. When placing gardens, remember that handymen need to have
access to them for watering. If they're not next to a path you'll need to
assign a handyman to them.
Theming shouldn't just be an after thought. Try to incorporate it into
the design of a ride - a vertical coaster can drop through a volcano or
coliseum or a mine train can wind around a mineshaft.
Finally, even the smallest square of land is an opportunity to place a
tree or statue - use it!
Back to the Top
|
Tutorial Copyright © by Skeg. Not to
be reproduced without permission.
|
|
::: Copyright © 2001-2007, Skeg RCT Fun, All Rights Reserved. :::
|